Thursday, February 28, 2013

Friends Layout..............

Oh the friendships we make in life will last forever..............
For this layout I used the new "Chantilly" level 2 paper pack plus paper from
 2 other kits (Stella & Surf's Up)! WOW that is how versatile our
level 2 paper packs are. I love how easy it is to mix & match between different
paper packs! The possibilities are endless!
The photo mats are "Sunset" & "Ruby" card stock and I used our
"Edge Distresser" roughly on the edges of the card stock to show the white core
inside our papers. I sponged "Pear" ink along most of the patterned papers.
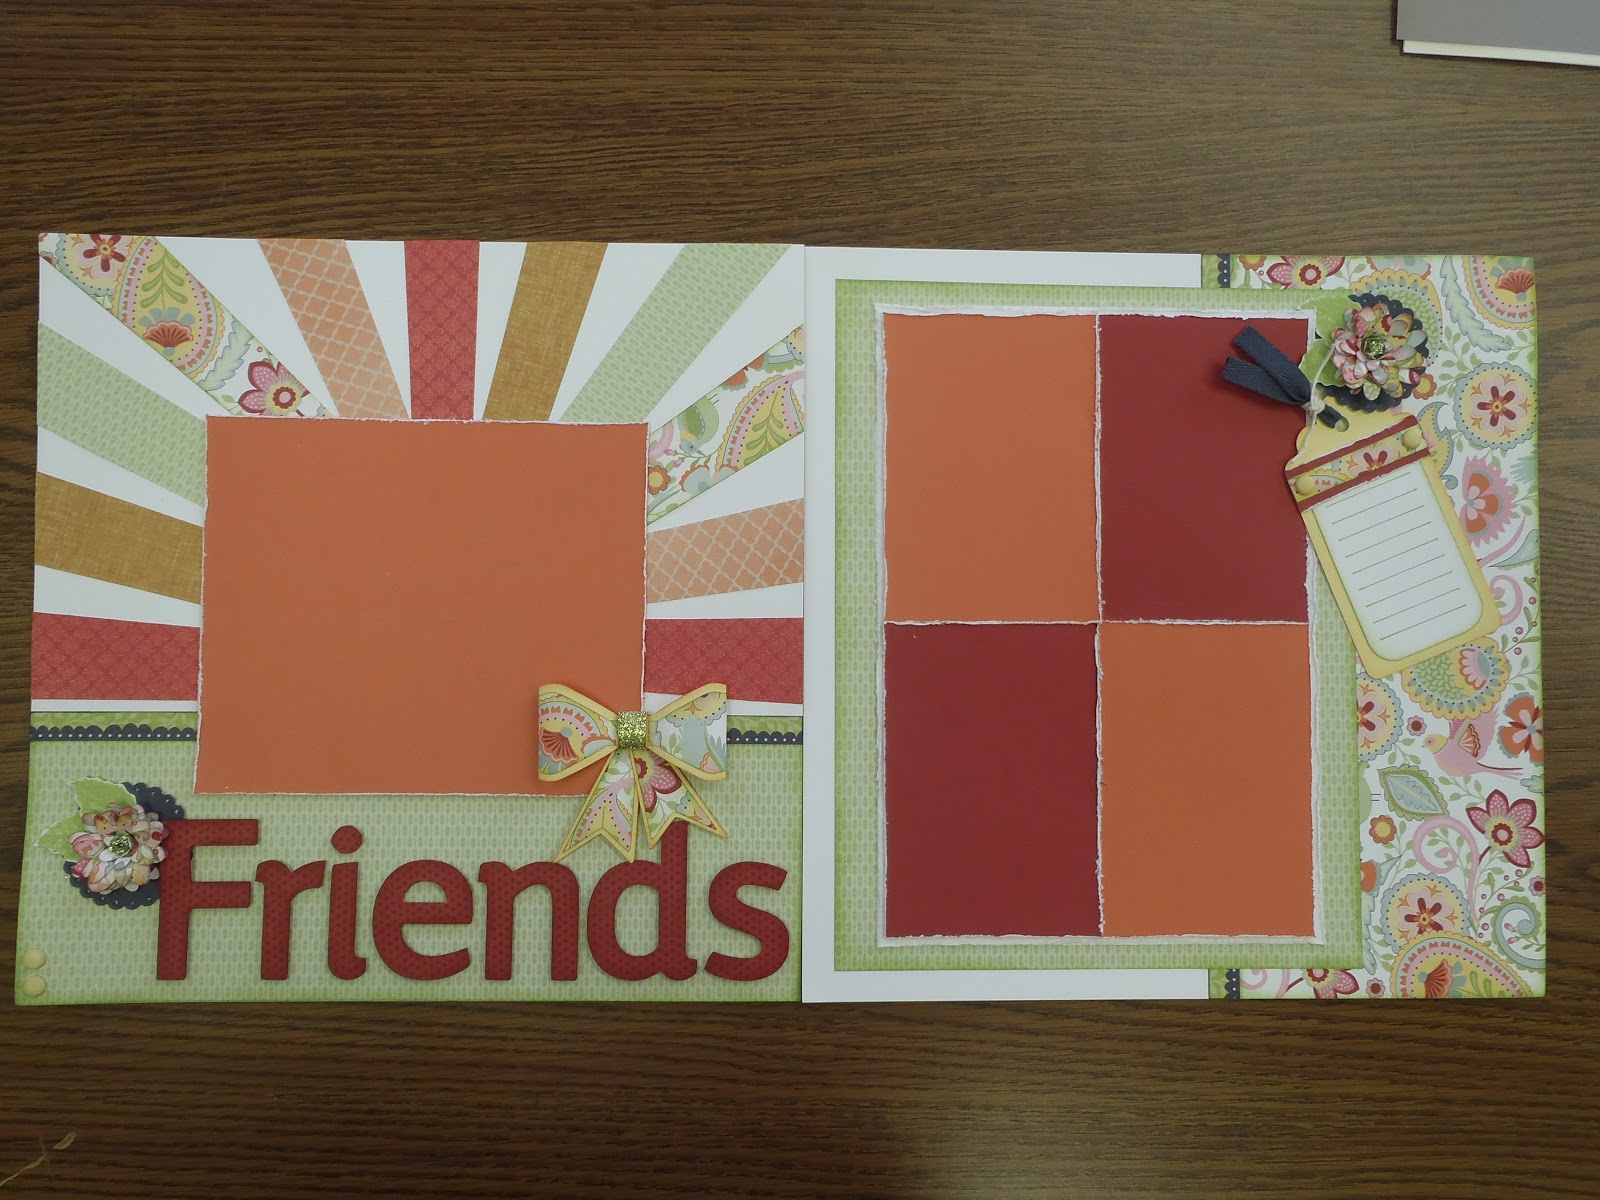
The left hand layout that says "Friends" is mirrored off the layout on
the cover of our new Spring/Summer 2013 Idea book. I just changes up
the colors & embellishments a little. This layout is a pattern featured in our
I used Reflections again to find a coordinating layout to match.
 The title & bow were cut out of the "Artiste" cricut cartridge & then stamped
with tiny polka dots. The 3-D flowers are created using the
"Art Philosophy" cricut cartridge. The 2" scalloped  punched was used
for the Outdoor Denim circle under the flowers. Green Glitz Gel
 tops off the center of both flowers & also on the center piece of the
bow just to add a little sparkle. I created a little tag for journaling.
I know just the photos I am going to use on this layout!!!
Happy Crafting!
~Creatively yours ~ Victoria


Wednesday, February 27, 2013

Oh Yeah! Boys Rule Layout


 To cute for words!!!! I crafted the left hand page from a layout in our new
Spring/Summer 2013 Idea book that featured the "Later SK8R" level 2 paper pack.
 I so love all the gears & skulls & paint splats in this paper pack, it really is all boy..............
The base is using Whisper card stock which I then rubbed the Whisper ink pad
all over the base to creative a texture look.
All the pieces of card stock & patterned paper are sanded along all the edges
to show the "white core" of our papers.
Once I attached all the paper pieces, I then used our ruler that has evenly 
spaced stitching holes to make holes along all of the darker grey "Slate" card stock
using our piercing tool kit . It makes a nice perforated look around the photo mates.
 I cut out the "Oh Yeah! Boys Rule" title using the
"Artiste" cricut cartridge, I also used the same cartridge to cut out the
Skulls in white & on our new silver glitter paper
The gears are hand stamped & cut out. I accented the gear clusters with
white & silver brads, stars, pins & washi tape.
I can't wait to put pictures on this layout.
Happy Crafting!
~Creatively yours~ Victoria


Tuesday, February 26, 2013

Birthday & Thinking of You Cards

 
Super cute & easy cards that I made with my Biggby Coffee Ladies featuring
3 awesome Level 2 paper packs from CTMH.  Grey Card #1 uses the "Avonlea" paper with
the "Just for You" stamp set and "Casual Expressions" stamp set.
We did a little sanding on the card stock, inked up the edges of the paper with our
ink pads & added the fun sparkly silver shimmer tapesparkles.
Blue & Red Card #2 uses  a Western paper called "Dakota" along with
Outdoor Denim & Barn Red card stock.
Again we sanded the card stock, stamped our images, added liquid glass to the
corrugated stars for this cute boys birthday card.
 The Brown Card #3 uses the "Clementine" Level 2 paper pack &
again using the "Casual Expressions" stamp set, sanding all cards stock & patterned paper.
We used our corner rounder to make the blue scalloped edges and the
scalloped circle punch & a piercing tool to finish off the card.
I cut out 4 flowers from our Art Philosophy cricut cartridge to create the
dimensional flower with a big rhinestone button & a bit waxy flax to tie it all together.
I hope this inspires you to sit down & create a few cards for your loved ones.
~Creatively yours ~ Victoria
 

Wednesday, February 20, 2013

Belated Valentines Cards....


Here are a couple cards I made for my Biggby Coffee card class this past month.
Happy Crafting :o)
~Creatively Yours ~ Victoria

Belated Valentines Layout & Cards...

 
If you were able to get the amazing "Whoo's your Valentines kit", after making
all the really cute Candy treat tubes, you know that you have some
glitter paper & cardstock left over.
Well, this is What I made just by adding in 2 sheets of white cardstock, ruby cardstock
& 4 cards. The layout is from our How- o-Magazine "Make It From Your Heart",
the layout is pattern 14, page 32. I used the Cricut Artiste cartridge to cut out the
"Funny Valentine" title. The inks used are: Ruby, Blush, Slate.
I stamped some of the images on the cards 1st & 2nd generation.
Which allows you to have the first image a bright & vibrant color &
then you immediately stamp the image again (w/o reinking the stamp)
to get a lighter version of the same color.  It's a really cool technique
to use when stamping & give an almost 3-D effect to your projects.
Happy Crafting :o)
~Creatively Yours ~ Victoria

Saturday, January 26, 2013

Operation Smiles


What a great charity that "Changes a Smile Forever"! In 2012, CTMH a contest in March that lasted for about 8 weeks & the challange was for convention attendee only.
You had to raise the most amount of money in that time frame & if you did you got a chance to travel with members from CTMH & Operation Smiles to a 3rd world country to help
with there operations for about 10 days.
I so wanted to do this, not just for the once in a lift time chance trip but to help change someone's life forever.
My aunt & cousin are RN's & have traveled with "Doctors without Boarders"many times
& I am so in awe of what they have done for so many people that it made me want to challange myself to make a difference in someone else's life too through "Operation Similes".
I sent out many letters & handmade cards to friends & family asking for their help.
 I was amazed by the support I received.
I received a letter from a corp. staff member right before convention saying that I was in the top five consultants that raised the most money & that they would be calling us to the stage to make the announcement.
But it was a secert & not to tell anyone. I was so excited at the chance.
 At convention,we were told that between the five of us we raised over $18,000. 
WOW is all I could say!
What an amazing accomplishment for just 5 people! I was not the winner of the Operation Smiles trip but was very happy & proud of myself that I could help change smiles for 72 people.
It only takes $240 per operation to make this happen.
If you would like to make a difference, go to www.victoria.ctmh.com to make a donation today to change someones life  forever.
You can go to My Shopping Cart  at the top right side of the page by Login, and add your donation to the My Shopping Cart check out page.
 
Thank you for your support ~ Creatively yours ~ Victoria

Friday, January 25, 2013

Roxy Purse


I so love our "My Creation Card Box"....I turned it into a cute little purse that I sent in as a submission to teach this past year at our CTMH convention.
The box comes white inside & out so I used our sponge applicator from out texture tool kit & inked up all the edges inside & out with Desert Sand ink.
I then cut patterned paper from the Roxy Level 2 paper kit.
( This is retired but we do have some new amazing new paper kits in the
Spring/Summer 2013 Idea book)
After I attached the paper to the card box, I used modge podge to seal the paper to the box.
The only side I didn't use this on is the front cover with the rose pattern.
 I used rosette ribbon for the handle with large rhinestone brads to hold in place on the sides.
 I cut a piece of cranberry card stock & folded it into a box fold to create a ribbon effect on the front & then attached the zebra patterned paper as an overlay.
 Bronze glitz gel was used on the Dimensional Elements large heart & flourishes around the center rose. Red glitz gel was used on the Dimensional Elements small heart.
I used liquid glass to give the large rose in the center front panel of the card box a shiny gloss.
To finish off the top with closures, I used foundry clips & small rhinestone brads. I
 so love how this turned out & I hope you do too.
Creatively yours ~ Victoria

Thursday, January 24, 2013

Shadow Box


I fun shadow box to celebrate a "Man's Best Friend".
I created this smaller shadow box for my Extravaganza Teaching  class at Convention 2010.
At the time I was showcasing our fun felt shapes, Topcoat over-lays, stamping,
distressing & fun embellishments. Most of these items are now since retired but I love how
just using a few items can showcase a special moment in time for years to come.
We lost our beloved Raja in 2009 & I wanted to make something special to show how much she meant to us. This is my traveling piece that I take to shows & events.
 I made a larger version for my husband for Christmas 2009 that also had her favorite toy,
a couple other photos & a lock of her hair.
It was a very emotional year for all of us but she will be in our heart forever.
I hope you love this as much as I do. Creatively yours ~ Victoria

Wednesday, January 23, 2013

CTMH Art Philosophy Cricut

I have made a few samples of some of the fun things you can make with the
At the top left is our French Fry box with note cards that has been ink distressed,
 stamped with CTMH Acrylix stamps & Level 2 patterned paper added.
At the top right is an silver frame decorated with Level 2 patterned paper,
wide stitched ribbon, AP cricut rosettes & AP cricut doilies accented
with rhinestone buttons & sparkles.
Bottom left is a small 3 x 3 card & heart shaped box for a little treat.  
Bottom right is a fun title topper from a scrapbook pages with the green base sanded to show our "white core" card stock, stamped with a fun flourish, cocoa pearls for accents.
I stamped the "Live, Laugh, Love" on our Level 2  patterned paper added Bronze glitz gel to the stars & out line of the middle banner piece.
The bottom "Thank you" card is touched off with a couple AP cricut rosettes, pearls & hand dry embossed leaves.  I hope live these creations.
Creatively yours ~ Victoria

Tuesday, January 22, 2013

11 x 17 Dry Erase Boards

 
A fun way to add a little something special to your kitchen or office and also lets you keep track of important weekly events. I made these neat dry erase boards during my
"Creative Weekend Get-a-way" with all of my crafters
& they loved them!
It was simple to assemble & decorate in not time at all. The 11 x 17 frames came from Walmart & the dry erase pens were purchased at the Dollar tree.
We also used patter paper for the base with coordinating colored card stock, & My Stickease stickers & a few other embellishments.
We ink distressed all of the patterned paper & card stock & stamped a few images.
 
If you are interested in making one of these dry erase boards or maybe two, you can find supplies on my website. There are several Level 2 paper kits & stickease to choose from @ www.victoria.ctmh.com under shop. 
I love how these turned out & I hope you so too. Creatively yours ~ Victoria 
 

Thursday, January 17, 2013

Clementine 3-D Wall Star


I love how this Star turned out and it is an actually piece of artwork that I made for teaching class at Convention Extravaganza 2012.
I used 4 different colors of card stock: New England Ivy, Creme Brulee, Saddle & Sorbet.
The techniques I used to create the shades on each of the stars points were as follows:
I heavily ink distressed each point with its matching ink, directly to the card stock.
I mixed the coordinating re-inker with a small amount of create-a-shade  pearl paint and a small amount of water to thin the paint out into a more translucent consistency.
I used the stipple brush from the texture tool kit & I brushed it in one direction only following the folds of the card stock.
I cute the center medallion from the Clementine Level 2 Paper Pack using the CTMH Artiste Cricut cartridge.
The word "Welcome" is the Houndstooth Dimensional Letters. I sponged them with Bamboo ink and attached them to the banner piece.
Lots of Bronze Durables, Ribbon & Hemp finished off this beautiful Star.
The finished size was over 24" across and to big to carry home after assembled, so I auctioned it off  at convention in my teaching booth to raise money for "Operation Smiles". I was thrilled that I was able to raise $90.00 for a very special cause. Creatively yours ~ Victoria

Wednesday, January 16, 2013

Crusin' Grad Layout


This is the second piece of artwork created for my Convention submission in 2012. 
I used  the now retired Crusin' Level 2 paper pack.
 I used photos that are black and white & I loved the way the diamond patterns worked with these graduation pictures of my son.
I used Liquid Glass on the letters and popped them up with 3D foam tape.
I accented the diamond pattered paper with shimmer brads.
On the tags in the pockets, I also used grey and white bakers twine.
I love the way this turned out & I hope you do too. Creatively yours~ Victoria

Tuesday, January 15, 2013

Victory Father's Day Card

This is a 6 x 6 card that I made for my convention teaching submission March 2012. 
I used the "Victory" Level 2 paper pack and lots of embellishments. 
This paper pack if available until the end of Jan. 2013 :0)
I started with a 6 x 12 piece of Bamboo cardstock, scored at 3 1/2 & 9 1/2 inches.
I used a piece of chocolate colored paper on the larger side.
The winged shield was cut from one of the other patterened papers from the Paper pack.
It was tied together with the Chocolate striped ribbon
I used Bronze glitz gel glue on one of the Milepost star, and I added the same glitz gel to the shield shape.
I tucked 2 Foundry Pin Clips behind the shield and a Canvas button above them.
Then LOTS of bronze durables :O)
I used the Bingo Alphabet for the lettering.
Hope you like it as much as I did - Love Victoria x